In this guide, we explain how to achieve WordPress multilingual functionality without relying on any plugins. While this approach offers advantages like full control over configurations, it requires meticulous manual setup and technical expertise. For example, navigating core WordPress settings and adjusting advanced options are necessary to ensure comprehensive internationalization coverage.
However, an alternative route using plugins like Polylang offers simplicity and thoroughness. Polylang streamlines tasks such as HTML tag management, Hreflang implementation (for SEO), and easy content translation, ensuring a smoother multilingual website experience. That is why we will still present both methods—without and with a plugin—so you can decide which best suits your needs or those of your clients.
Let’s start with what you came for how to set up WordPress multilingual without a plugin.
1. Install and Set Up WordPress Multisite
Achieving multilingual capabilities without a plugin is achievable through a multilingual network with the multisite WordPress configuration. Multisite is a built-in WordPress feature that enables multiple websites on the same WordPress installation. It allows you to switch between your sites in different languages from a central location.
| 💡For this tutorial, we assume you already have WordPress installed on one site. If not, you can follow this guide and install WordPress in a few steps. |
Here’s how to set up multisite on WordPress:
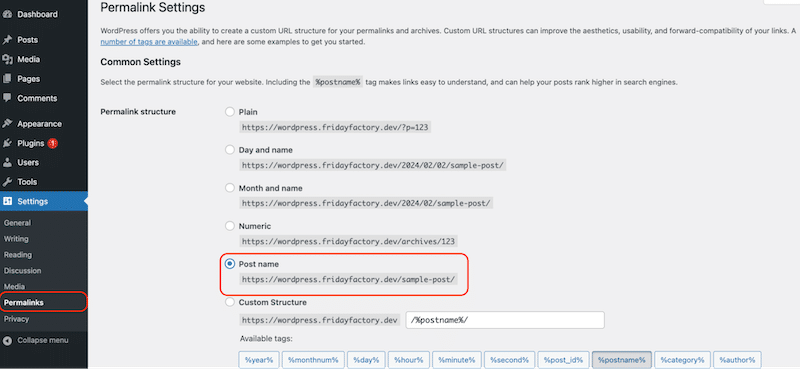
- Ensure your site has no active plugins and your permalink structure is set to Post name (from Settings > Permalinks).
- Access your site via FTP. This can be accomplished through your hosting provider’s control panel (such as cPanel) or a third-party application like SmartFTP or FileZilla.
| 💡Hint: Before proceeding with the following code modifications, creating a backup of your site is strongly advised as a precautionary measure. |
- Download the configuration file, called wp-config.php, to your desktop and open it with a text editor like Sublime Text.
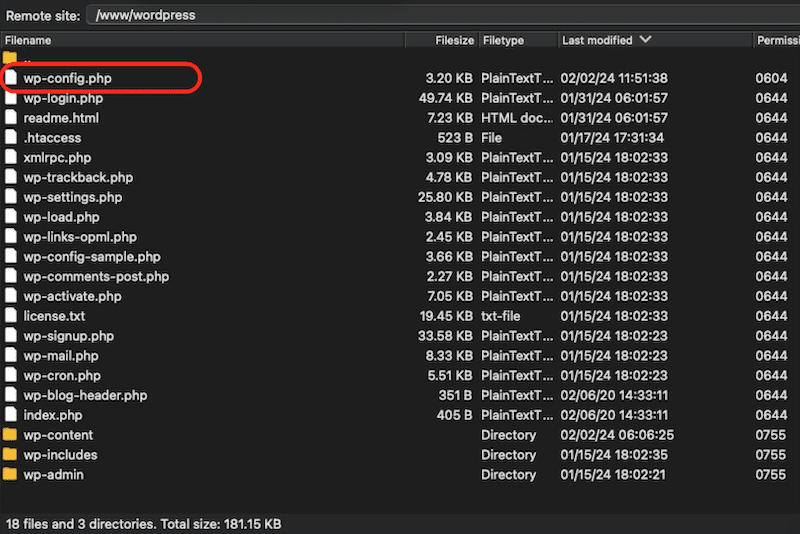
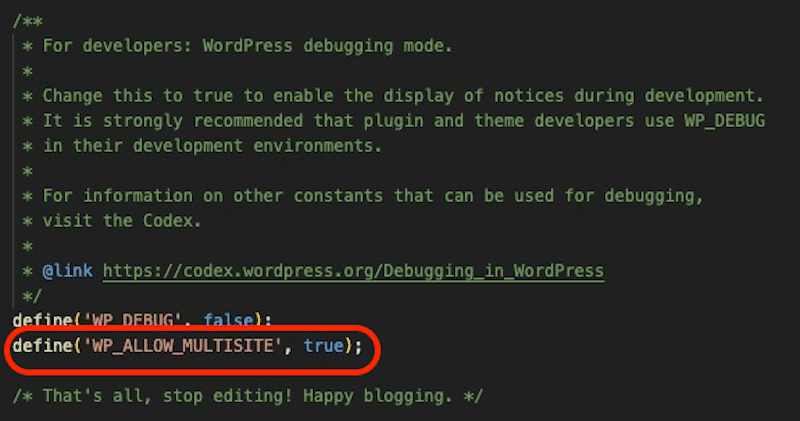
- Insert the following line of code directly above the line that reads /* That’s all, stop editing! Happy blogging. */:
define(‘WP_ALLOW_MULTISITE’, true);
You should get something like this:
- Re-upload the modified wp-config.php file back to your server
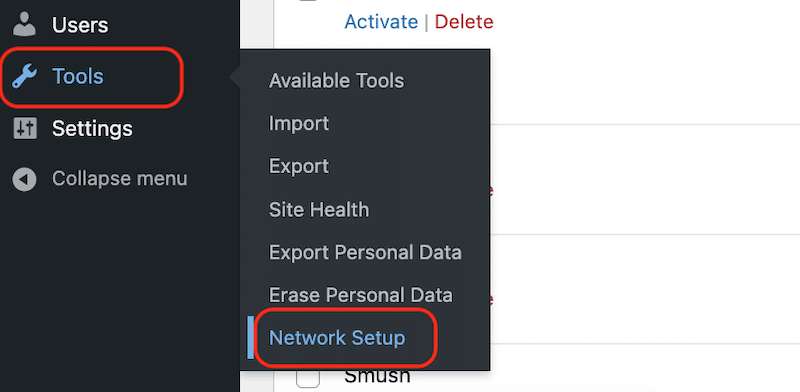
- Go to your WordPress admin and open Tools > Network Setup
- You are now in the Network installation process.
Addresses of Sites in your Network – You can choose the Sub-domains option to create two multilingual sites in English and French. Your multisite configuration would look like this:
– en.mysite.com
–fr.mysite.com
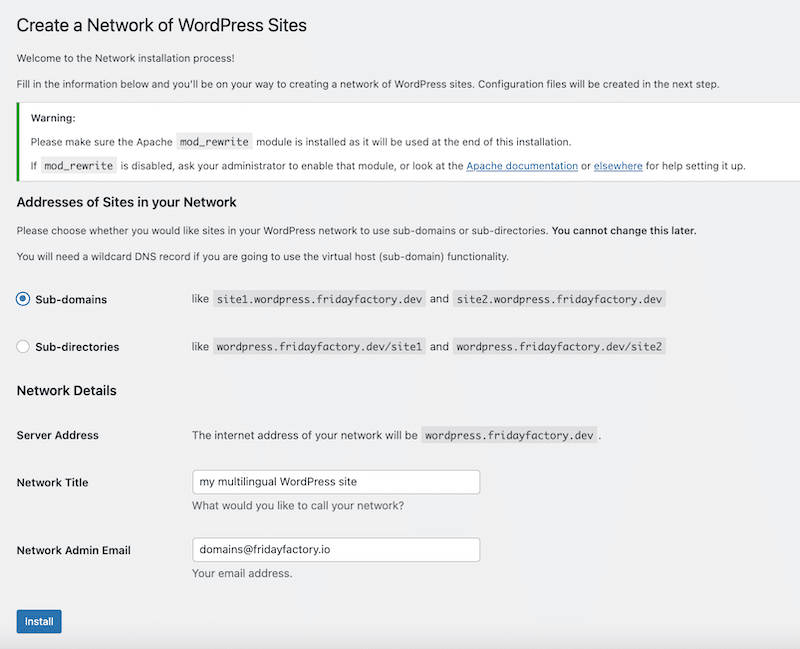
Network Title – We called it “my multilingual WordPress site” as several languages will be created for each site.
Network Title – You can leave the admin email as it is.
- Hit the Install button
- To enable the network, WordPress is telling you to add some lines of code in your wp-config.php and .htaccess files. If you haven’t backed up your site yet, now is the time to do so!
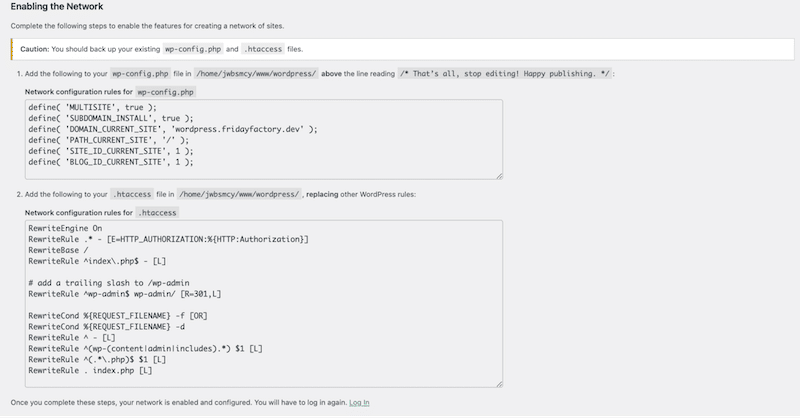
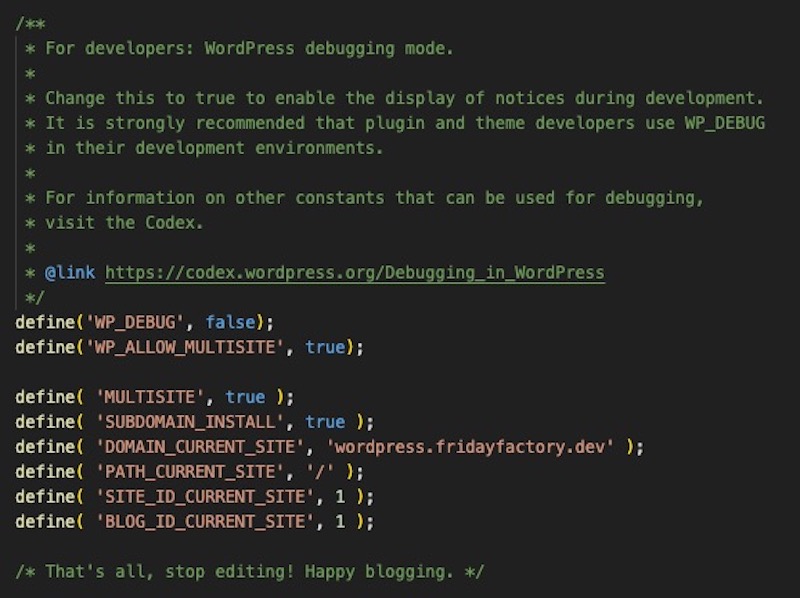
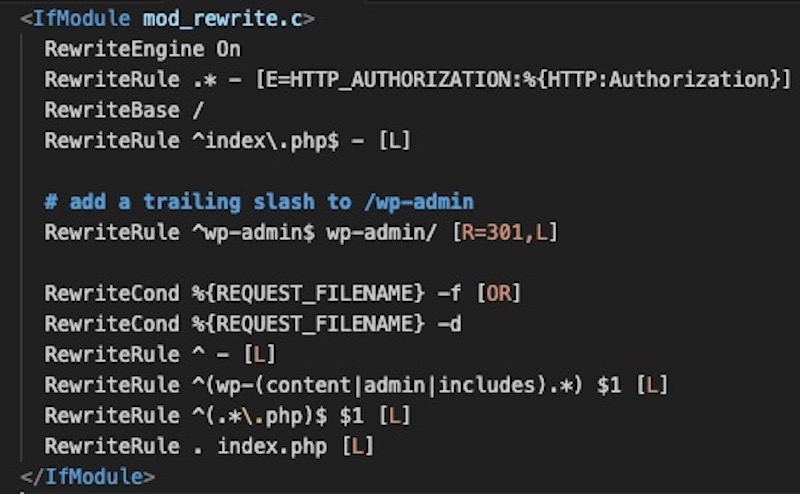
Open your wp-config.php and .htaccess files to add the code shown in the figure above. You should get something similar to this:
| Setting up the multisite network for our multilingual site on the wp-config.php file | Setting up the multisite network for our multilingual site on the .htaccess file |
 |  |
- Login into your WordPress site again.
- The multisite is ready to be used as you can see a new menu from the top left called My Sites.
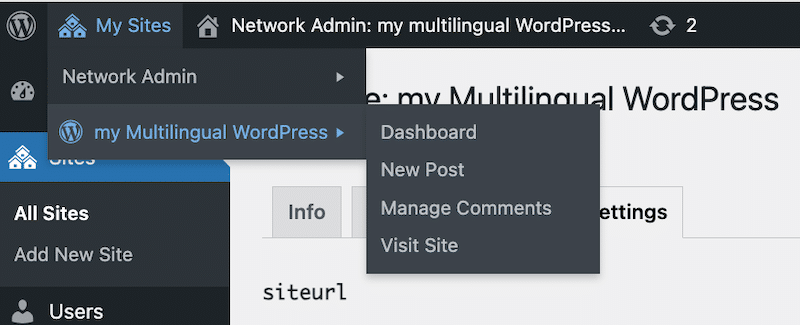
Now that the multisite configuration is ready, let’s see how to add another language to our site.
2. Set Up a New Language Site on the Network
The goal is to create separate sites for individual language versions. We already have one site as part of our Multisite setup so we will keep this one as our primary language: English.
Let’s create a new site for French.
- Make sure you are in the primary network admin through the top menu. Go to My Sites > Network Admin > Sites > Add New Site.
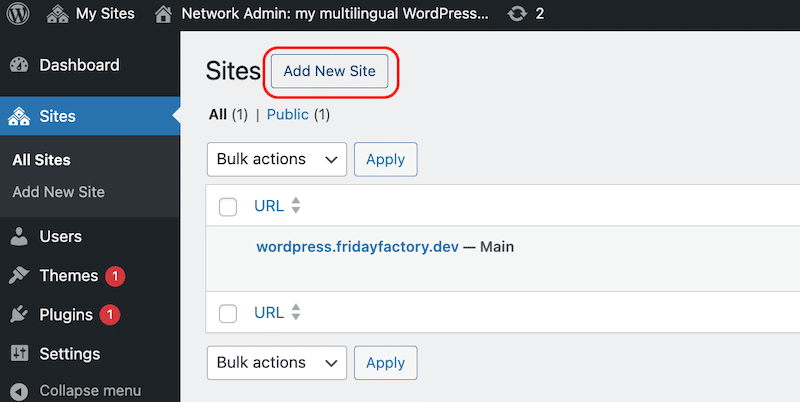
- Fill in each field of your new site.
- Site Address – We create a subdomain with the “fr” country code for French
- Site Title – Mon site en Français (meaning my site in French)
- Site Language – French (or any language according to your needs)
- Admin email – Put your email as you’ll receive the username and password in that inbox.
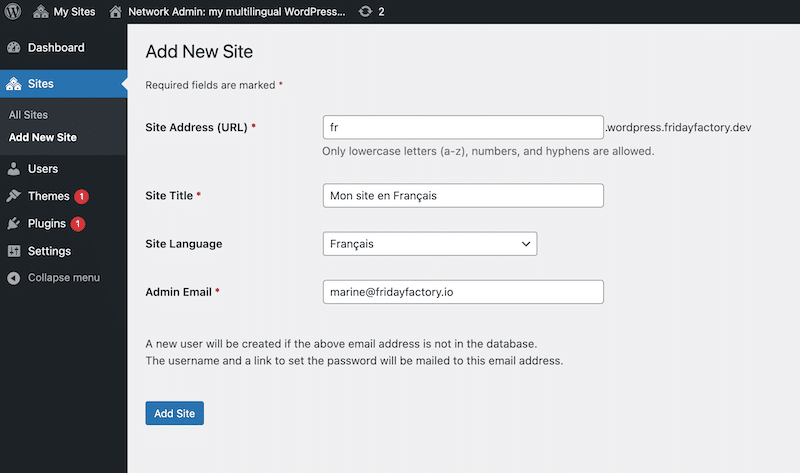
- Press the Add Site button
- The last step is to create the subdomain from your cPanel (hosting provider). Usually, you need to follow that path: cPanel > Domains > Create A New Domain. Enter the new subdomain according to the language that you need.
- Here’s our French site accessible to this subdomain address: fr.wordpress.fridayfactory.dev
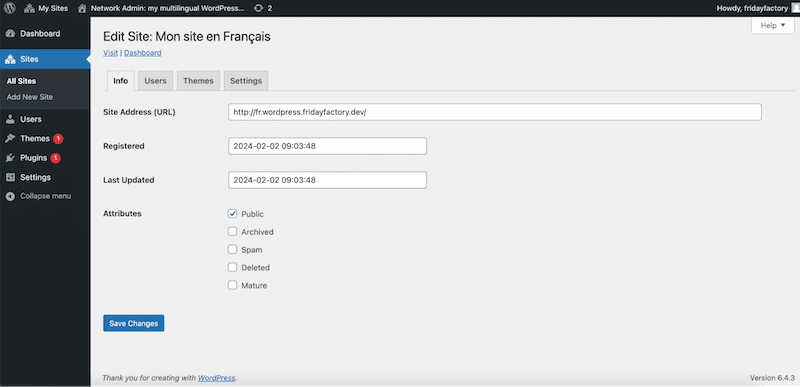
- That’s all! We’ve established two websites: one in English, and the other ready to accommodate content in French.

| 💡Repeat the process to generate additional sites if you need to add more language to your WordPress site. Simply keep in mind to use the country code in the subdomain. |
3. Install Your Theme and Plugins on the WordPress Multisite Network
You’ve created two WordPress sites, but the new one is blank. You’ll need to recreate your entire setup and design manually. This involves going through each plugin and settings individually, ensuring you duplicate all settings precisely. This process may take some time.
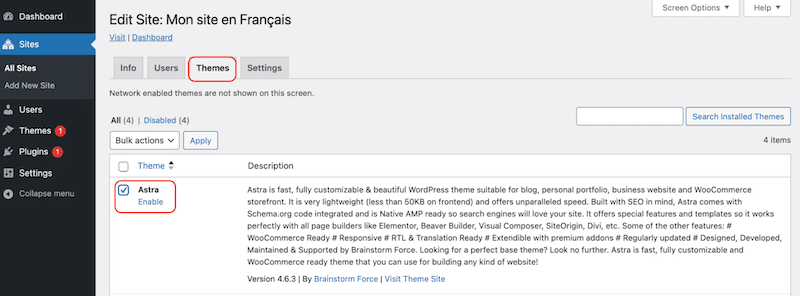
To add a theme, go to the Themes tab and click on Enable near the theme you are using on your initial site. In our case it’s Astra:
To add a plugin, go to Plugins > Add new, from the regular WordPress menu.
4. Transcreate your Content
Once your theme is operational on your secondary site, it’s time to restructure your whole content for the secondary language, a process known as transcreation. It goes beyond simple translation and everything must be taken into account: from design and visual elements to tone, style, and cultural references. Always bear in mind the target audience!
Translation vs Transcreation
While translation focuses on fidelity to the original text, transcreation emphasizes adaptation to the target audience’s language, culture, and emotions.
Below is a simple table outlining the key differences between translation and transcreation:
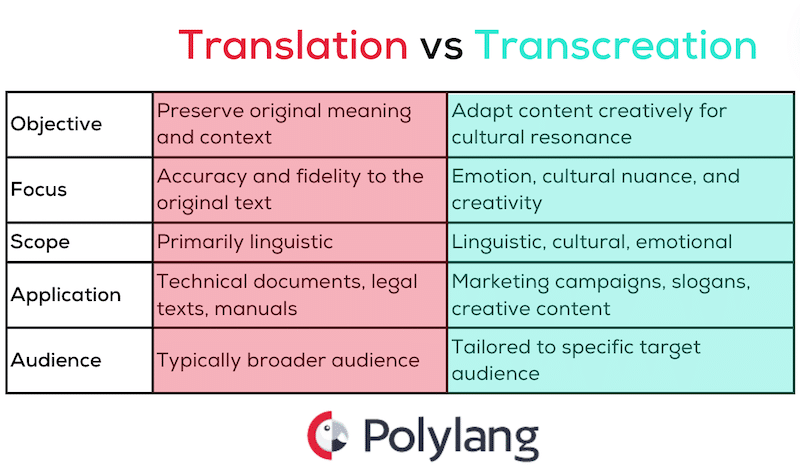
Transcreation involves crafting fresh content that effectively conveys the brand’s voice and message in a different language. It goes beyond mere translation, aiming to adapt the content to suit a particular cultural context. Transcreation is particularly valuable for emotional content such as marketing campaigns.
For example, pay attention to your slogan and ensure it’s not translated too literally; opt for transcreation over translation. Much of this transcreation process for the second site cannot be automated with AI and must be completed manually.
5. Create Your Custom Menu and Link Your Websites Together
Now that you have two distinct websites in two different languages, you need to enable visitors to switch between them. The easiest method is to include a link to the other language versions from the main menu. In our example here’s how we will proceed:
- We need to add a link to the French website from the English menu
- We need to add a link to the English website from the French menu
This is how my menu will look like on the English version:

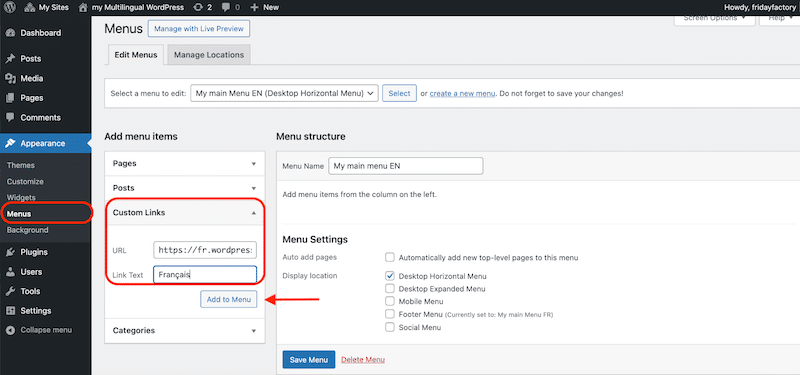
- Go to the dashboard of your primary sites and navigate to Appearance > Menu. In the Custom Links section, add the URL to your target website (French for us with the following URL: fr.wordpress.fridayfactory.dev) and press the Add to Menu button.
- You now have a new page added to your menu that links to your other site using the secondary language. We’ve also added an emoji to guide the user to our “language switcher”.
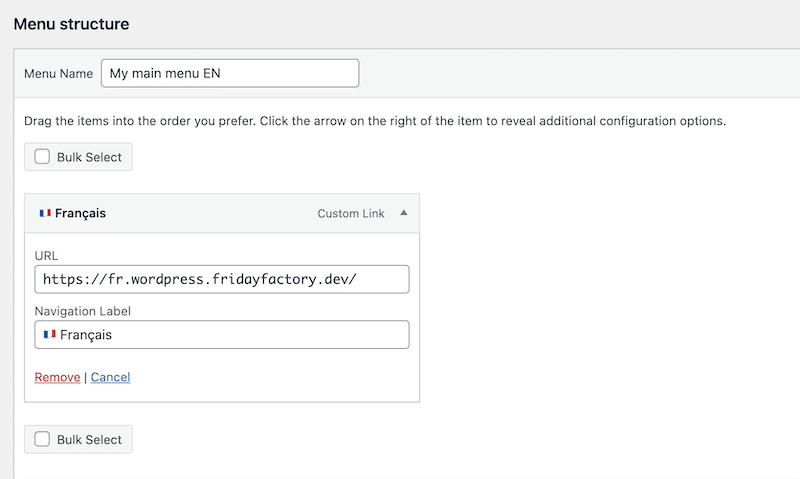
- Repeat the process from the French dashboard and in the Custom Link section, add the English URL with an emoji flag.
As you can see, creating a multilingual site without a plugin is completely feasible but it requires some technical knowledge. Doing so can result in increased complexity, maintenance overhead, and limitations compared to using dedicated multilingual plugins.
Pros and Cons of WordPress Multilingual Without Plugins
Pros of WordPress Multilingual Without Plugins:
- It’s free: you don’t need to purchase any plugin or extra add-ons to make it work
- Total Control: Users have complete control over the setup and configuration of language-specific content without relying on third-party plugins.
- Unlimited sites: You can add as many languages as you like.
- Design flexibility: You can create separate designs for each language very easily as the second site is a blank canvas.
Cons of WordPress Multilingual Without Plugins:
- Not SEO-friendly: Hreflang tags are important in SEO because they help search engines understand and serve the correct language or regional version of a webpage to users based on their language and location preferences.
- Entire Manual Setup: Configuring language-specific content, navigation, and URLs requires manual intervention, which can be time-consuming and prone to errors.
- Heavy Maintenance: Without plugin assistance, managing language variations, updates, and content synchronization across multiple sites becomes intricate and demanding, especially for the stocks of a WooCommerce site for example.
- Limited Features: Lacking all the features for comprehensive multilingual support, such as language switchers, SEO optimization for different languages (hreflang tags), and automatic content translation.
- Scalability Challenges: As the site grows, maintaining consistency and coherence across multilingual content becomes increasingly challenging without plugin functionalities for centralized management.
- Poor language switcher: When a user switches the language, the redirection will always be to the homepage first of the translated site, not the “current” page.
| We know that you came here to learn how to set up WordPress multilingual without installing a plugin BUT just in case you found this tutorial quite advanced, remember that you have WordPress plugins out there that can do the heavy lifting for you! |
Creating a WordPress Multilingual Website with a Plugin
The Polylang plugin will translate your WordPress site easily and even add a language switcher to it, no coding skills are required! Highly-rated, and SEO-friendly WordPress Multilingual plugins, it has over 700,000 installations and a 4.7/5 rating on wordpress.org!
Here’s how to launch a multilingual site with Polylang in 5 easy steps:
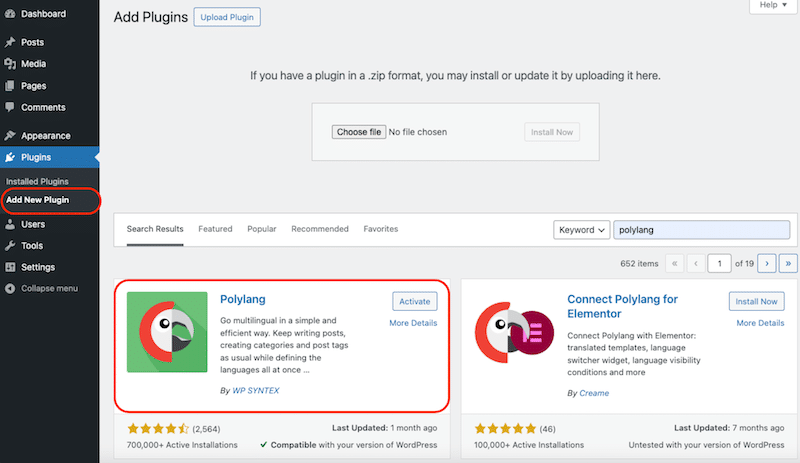
- Download and Install the Polylang plugin, from Plugins > Add New Plugin
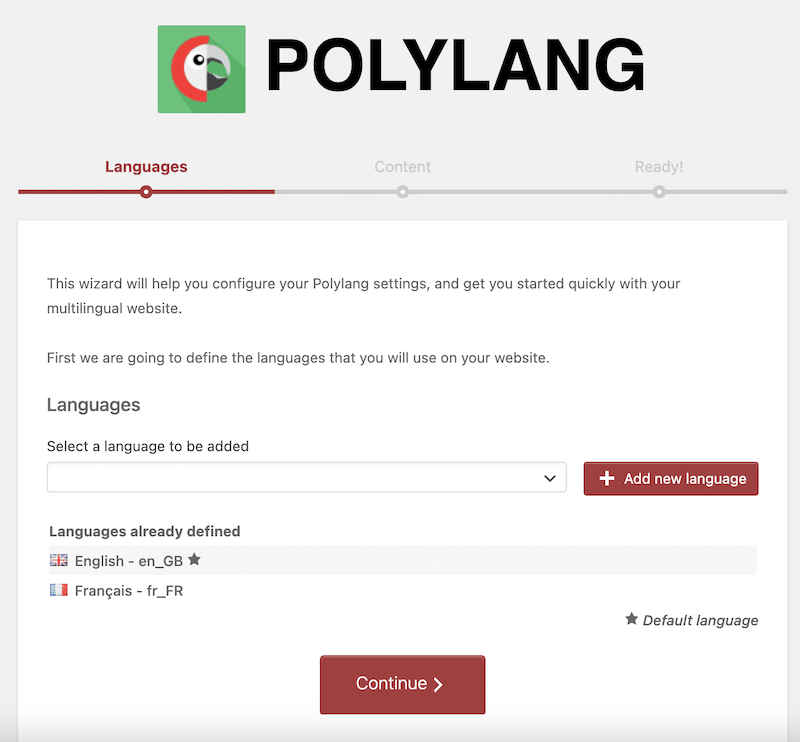
- Follow the short installation wizard to add the languages of your choice, translate media
- Add a language switcher directly from Appearance > Menu

- From Posts or Pages, simply click on the + button to translate your content:

- The other text strings can be easily translated via the Translations table accessible from Languages > Translations
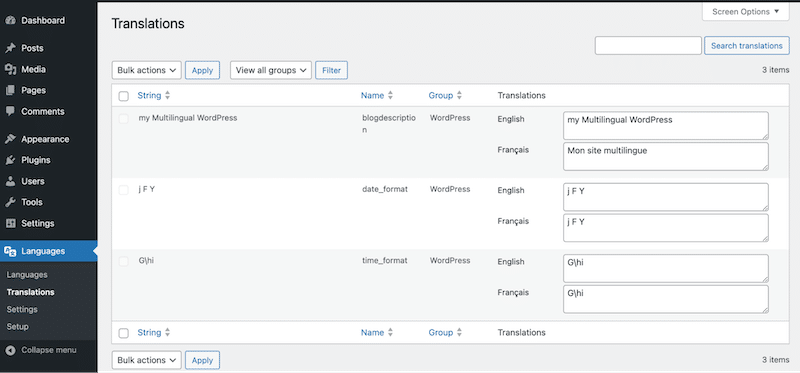
As you can see, the process is easier and much more straightforward with a plugin. And wait, here are some additional reasons you may consider using a translation plugin such as Polylang for your multilingual project.
- SEO-friendly: Polylang uses Hreflang tags and is fully compatible with Yoast SEO which ensures that multilingual SEO principles are respected.
- Faster process: Build a multilingual in a few minutes with a user-friendly interface.
- Free plugin: A free version is available so you can build a multilingual website without spending any money.
- No coding knowledge ever required: Polylang set up the multilingual site on your behalf and there’s no need to edit any of your WordPress files.
- Keep the same design across languages: You can synchronize and keep the same settings across all languages.
- Language switcher: Create a WordPress language switcher easily and decide where to display it (main menu, top bar, footer, in a widget, or anywhere on the site).
How to Set Up a Language Per Domain With Polylang
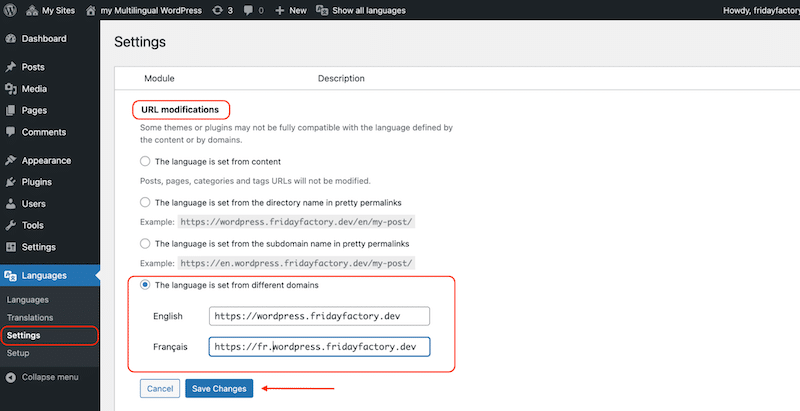
Another benefit of using Polylang is that you can achieve the same URL results as all the manual steps we showed in the Multisite section. All you need to do is go to Languages > Settings > URL modifications > Select The language is set from different domains > Add the subdomain for each language. Press the Save Changes button.
In conclusion, while it’s technically feasible to develop a website without plugins– using the multisite functionality – the process can be cumbersome and lacks the comprehensive internationalization coverage offered by dedicated plugins like Polylang. Utilizing plugins such as Polylang significantly streamlines the localization process and ensures that all aspects of internationalization, including HTML tags, Hreflangs (SEO), and simplified content translation, are effectively addressed. Why not give Polylang a try? Download Polylang today and translate your website faster, keep your design consistent across languages, and rank better on the international markets!