Do you want to learn how to create a multilingual WordPress site?You’re taking the right direction! Adding multiple languages on WordPress unlocks opportunities to expand into new markets and connect with a worldwide audience. With the right guidance and tools – like the Polylang plugin – the process becomes streamlined and accessible to all.
In this guide, we’ll explore key considerations and provide a step-by-step approach to help you launch your multilingual WordPress site in minutes.
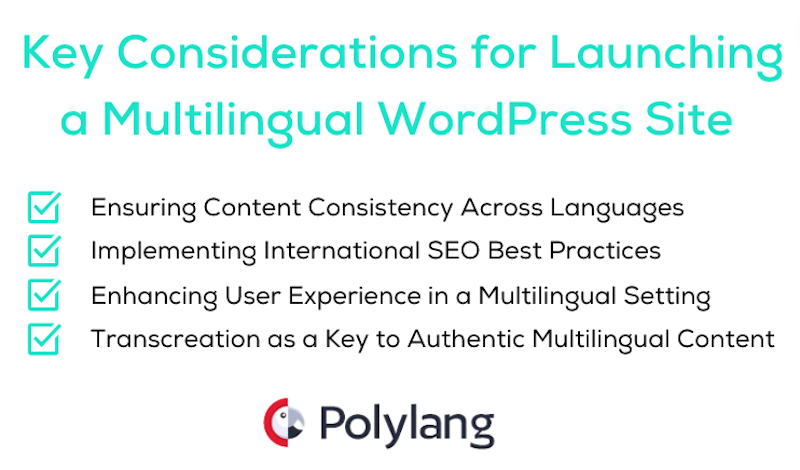
Key Considerations for Launching a Multilingual WordPress Site
Ensuring Content Consistency Across Languages
Content consistency is crucial for maintaining your brand identity across languages. Ensure that the translated context aligns closely with the original content in terms of meaning, context, and brand voice.
Implementing International SEO Best Practices
Optimize each language version of your site for search engines by using appropriate keywords, meta tags, and hreflang tags to indicate language and regional targeting. Consider using a WordPress SEO plugin that can tell Google to show your Italian pages to Italian speakers, your French pages to French users, and so on.
Enhancing User Experience in a Multilingual Setting
Make the whole experience intuitive by providing a clear language switcher where users are expecting it; in the navigation menu or the footer. Always make sure that users can easily find content in their preferred language.
Transcreation as a Key to Authentic Multilingual Content
Transcreation means crafting content to suit cultural nuances and language preferences, ensuring that your message resonates with audiences across different regions. It goes beyond simple technical translation.
To summarize, save our checklist before you start creating a multilingual WordPress site:
How to Translate Your WordPress Website in 5 Easy Steps
In just five simple steps, you can unlock the potential to reach a broader audience with Polylang. The process is very easy and can be done directly in your WordPress admin. Polylang’s interface is minimalist and follows the WordPress logic meaning that no extra tables are added, ensuring a fast performance.
Polylang is one of the most popular, best-rated, and SEO-friendly WordPress Multilingual plugins out there (with +700K installations and a 4.7/5 rating).
-
-
-
Set Up Polylang as Your WordPress Translation Plugin
-
-
Install the Polylang plugin from the WordPress directory and configure it to manage multiple languages on your WordPress site efficiently.
- From your WordPress dashboard, install and activate Polylang from Plugins > Add New Plugin
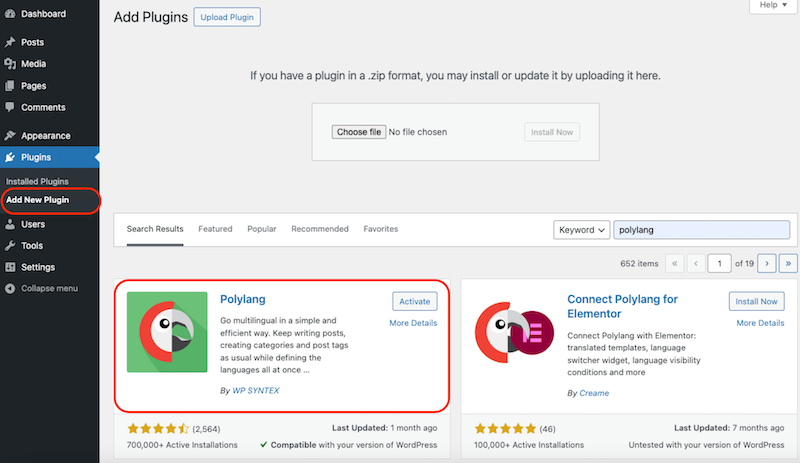
Installing Polylang from the WordPress admin
- To help you get started, there is a simple wizard to follow, it allows you for example to add the languages of your choice:
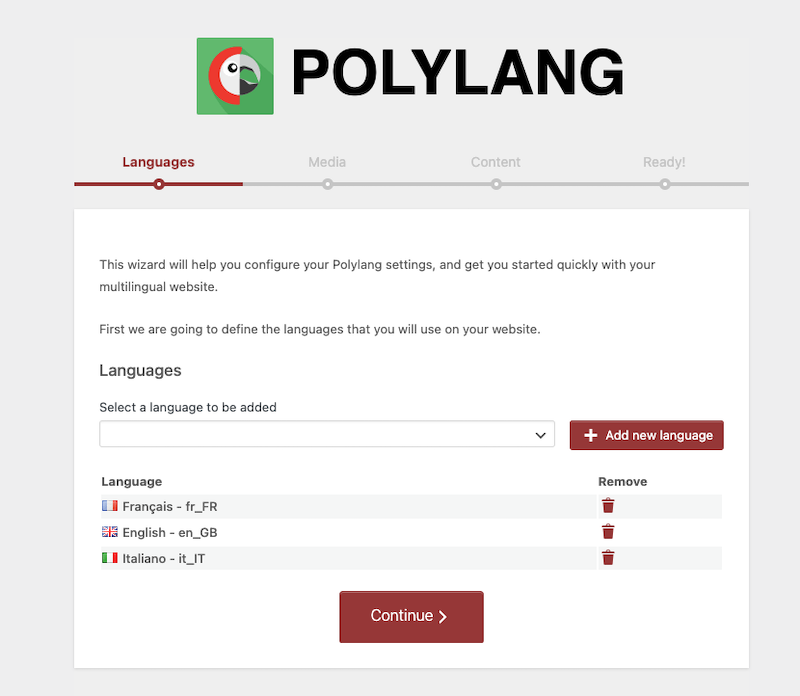
Adding languages to my site (and to my language switcher)
When it comes to going multilingual, you have generally two paths to consider:
- Manual Translation – Involves the process of translating content from one language to another by a human being (e.g.: a professional translator).
- Automatic Translation – Also known as “machine translation”, is the process of using algorithms and software to translate without human intervention.
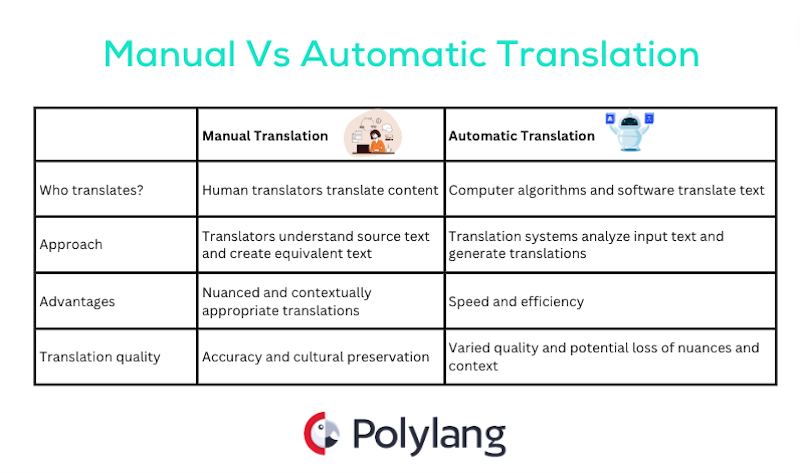
Manual vs Automatic translation explained – Source: Polylang
Let’s go into the details of the pros and cons of manual and automatic translation methods. That should help you select the approach that best suits your content and budget. Here’s a short list of pros and cons for both manual and automatic translation methods:
Manual Translation (Pros)
- Greater control over translation quality and accuracy.
- Ability to capture cultural and marketing nuances.
- Maintain tone and style consistency across every language.
- Ideal for specialized content that requires human interpretation: perfect for transcreation.
Manual Translation (Cons)
- It can be time-consuming, especially for large volumes of content.
- Professional translators can be costly.
Automatic Translation (Pros)
- Quick for translating large volumes of content: instant translation for immediate understanding.
- Cost-effective.
Automatic Translation (Cons)
- Not recommended for transcreation: inability to capture tone, context, and cultural nuances accurately.
- There is a risk of producing nonsensical translations, especially with idiomatic expressions or specific technical terms that could be awkward for the end-users.
How to Use Manual Translation on WordPress
Polylang automatically sets up the manual translation on your WordPress site. All you need to do is start translating your pages, posts, and other content strings directly from the Admin. If you want to translate a page manually, go to Pages > All pages and press the + button to add the translation.

Manual translation with the plus button
How to Use Automatic Translation on WordPress (Polylang Pro + Deepl)
The automatic translation – powered by Deepl – is now available in Beta mode with Polylang Pro. The translation is editable so you or a translator can easily adjust it directly from WordPress.
Note: At the moment, only the content from Posts (tags and categories), Pages and Custom Post Types (e.g.: Products, Projects) are translatable using machine translation.
Here’s how to activate the machine translation with Polylang Pro:
-
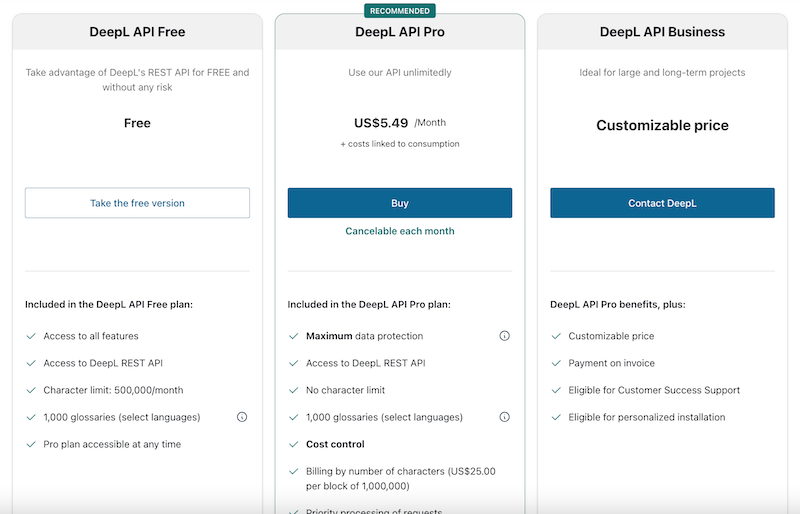
Get an API key from Deepl – you can take the free option (500 000 characters or choose the premium plan: it depends on the number of words that need translation).
-
Install Polylang Pro (V3.6 minimum to have the automatic translation feature)
-
Go to Languages > Settings and make sure the Machine Translation option is activated:
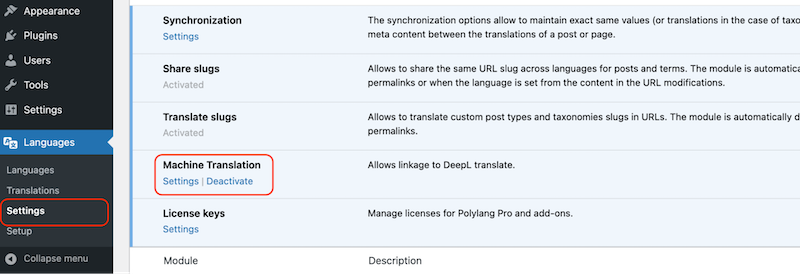
Activating the machine translation with Polylang
-
Click on the Settings link below the Machine Translation subcategory:
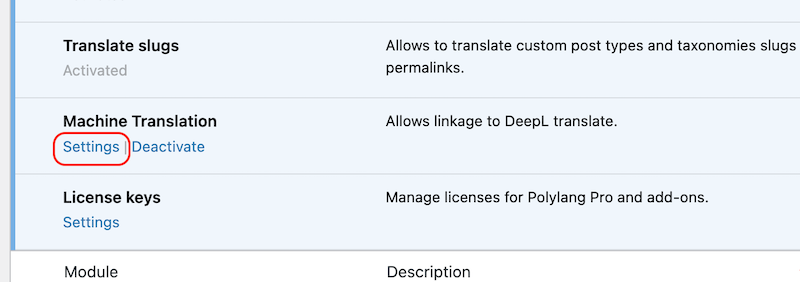
Machine translation settings with Polylang
-
Add the API key that you got from Deepl and select the translation tone in the Formality dropdown menu. Click on the Save Changes button.
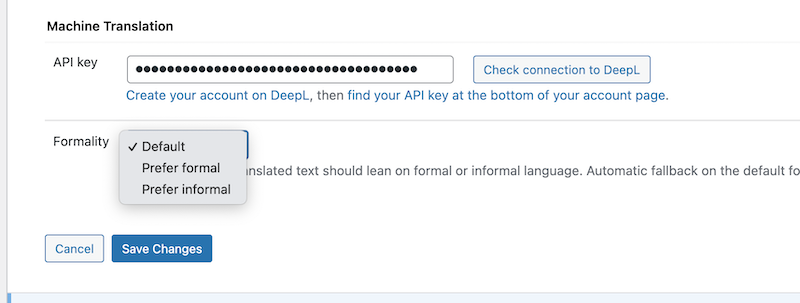
Choose the tone of the translation
-
Open a page that needs translation and go to the language meta box as shown below. Click on the grey Deepl icon to activate Deepl:

Activating Deepl to translate posts and pages
-
Now that Deepl is activated (in blue), click on the + button next to the language flag that needs translation.
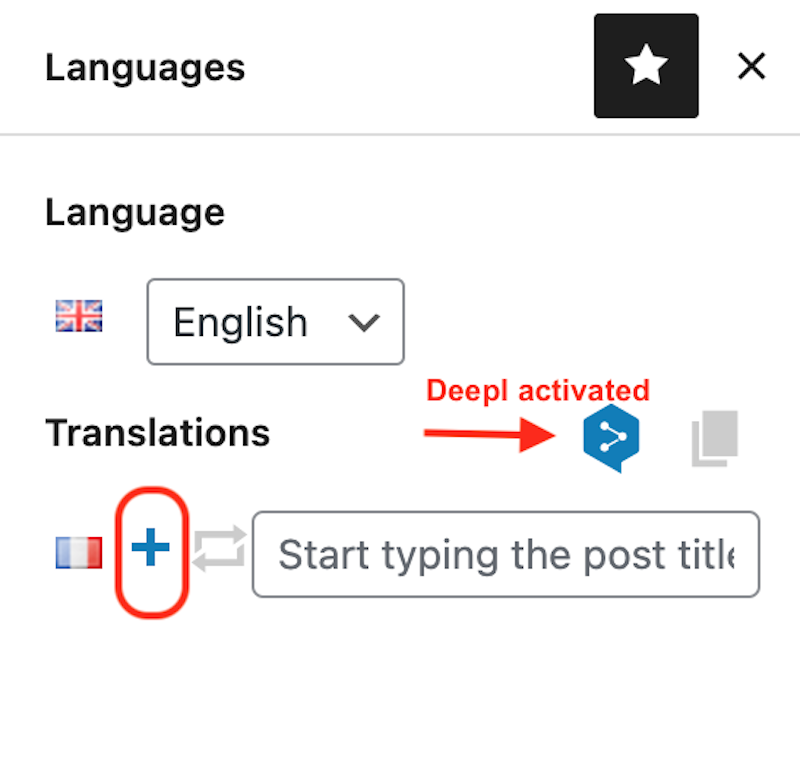
The plus button to add the automatic translation
-
That’s it my English page has been translated into French automatically. You can edit it manually to edit the translation if needed.
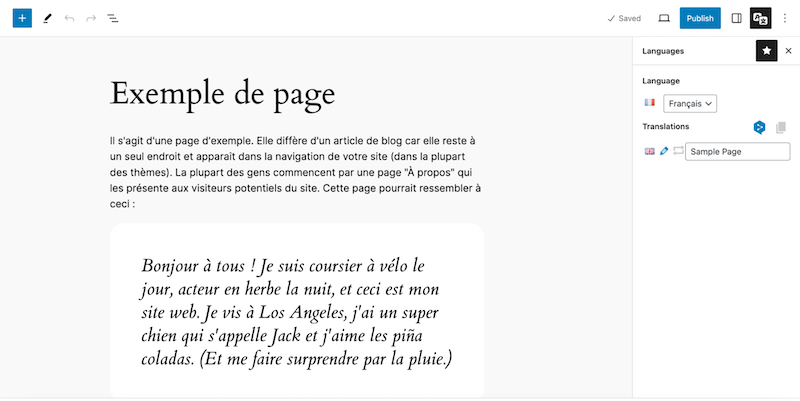
Page translated to French in one click with Deepl and Polylang
Pricing:
The automatic translation is free for up to 500,000 characters and then it’s $5.49/month plus $25 per block of 1M characters.
Make sure that your entire WordPress theme is translated such as menus, widgets, and footer text to ensure a cohesive user experience across languages. To make sure that your theme is translated properly, you can use tools like LocoTranslate along with Polylang.
LocoTranslate is a free plugin that allows you to translate your theme and plugins easily.
-
Download LocoTranslate from WordPress.org and activate it.
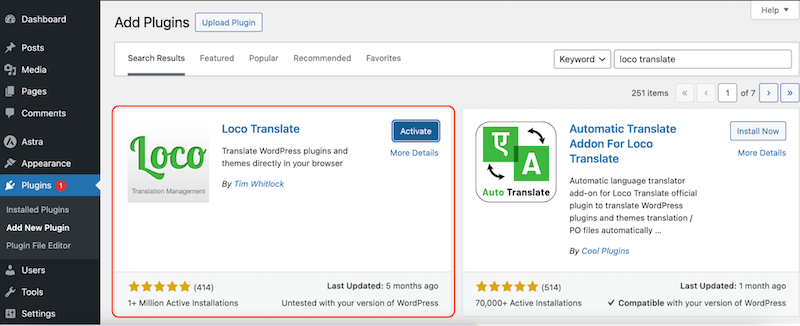
Installing Loco Translate from the WordPress admin
-
Add a new language:
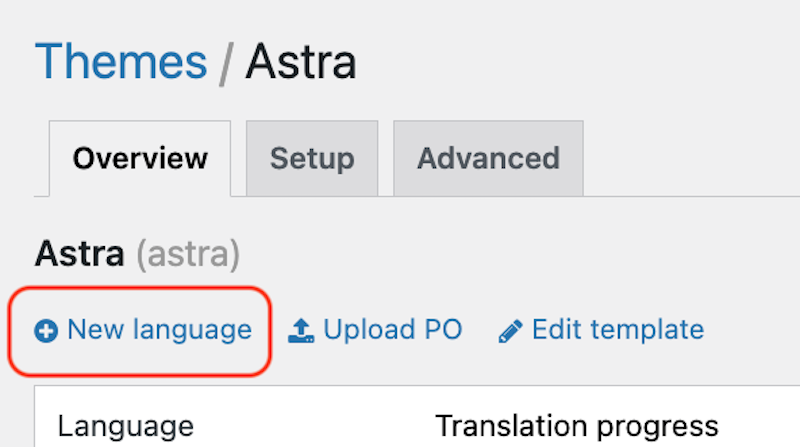
Add a new language button
-
Start translating your theme:
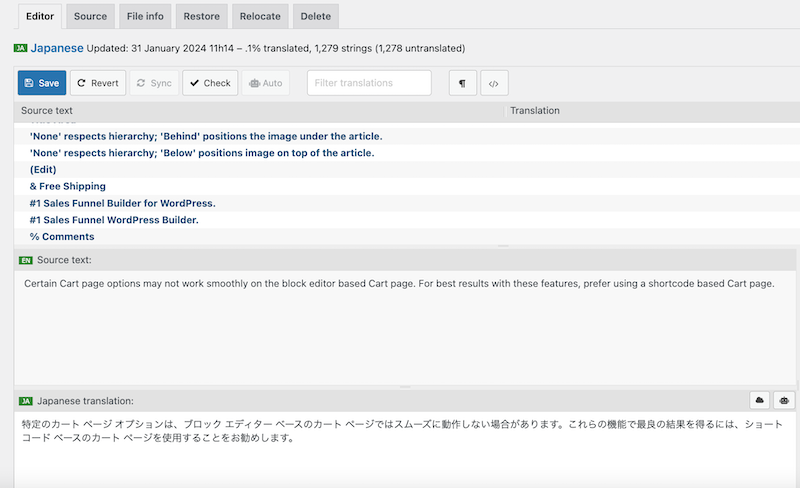
Adding the Japanese translation to the PO file
Once you are done with your theme translation, Polylang will make sure to display the right language to international visitors.
Translating Posts and Pages with Polylang
-
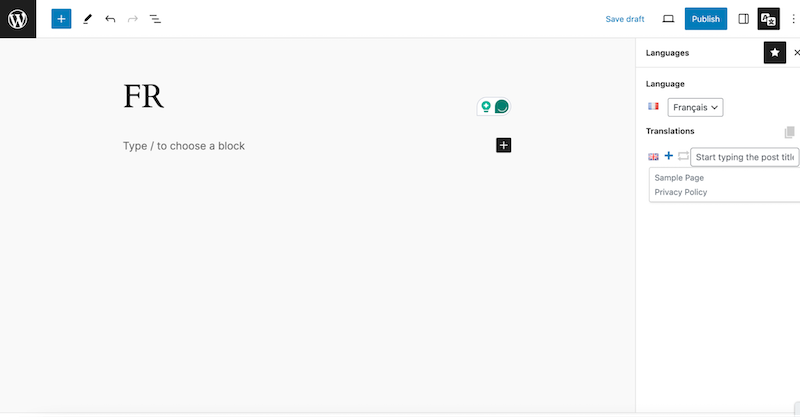
From your WordPress admin, go to Pages > and click on the + button:

-
Simply add your translated content to the new page:
|
💡Pro tips: Polylang Pro comes with bulk translate and duplicate content features, which copy the content of the source post into the content of the target post. This allows to duplicate your content in a few clicks and to start the translation immediately. |
Follow the same process for your blog posts if you have any from Posts > the + button.
Translating All the Other Strings with Polylang
Besides your post and pages, you will also need to translate the rest of your content including URLs, strings from contact forms, and the SEO data to make Yoast SEO multilingual, for example.
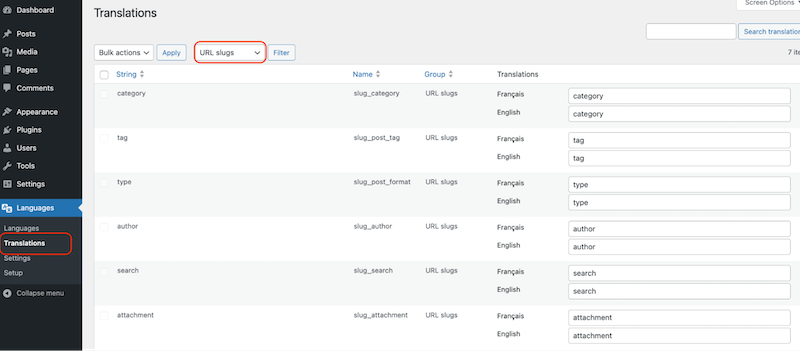
To translate the rest of the strings go to Languages > Translations and look for the string of your choice using the search bar.
For example, to translate URLs (you’ll need Polylang Pro), you can choose to filter by “URL slugs” so you can translate only the content related to URLS:
Add the translated content in the dedicated field (last column) and click on the Save Changes button:
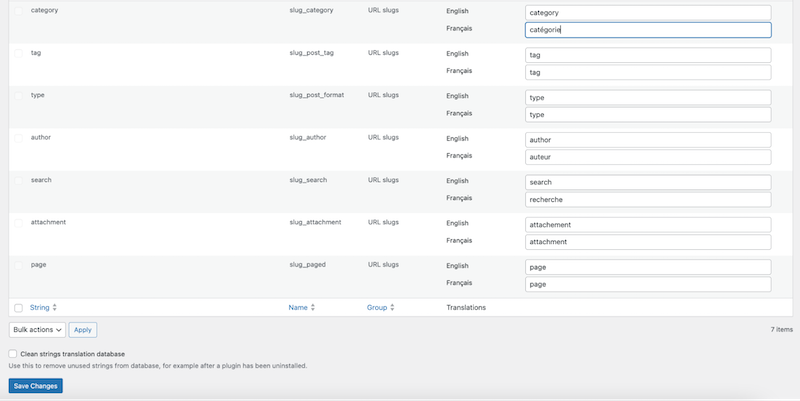
Translating URLs slugs with Polylang Pro
Translating Theme and Plugin Options
These dynamic strings are filled in manually by the user in the theme and extension options in the back office. Theme and plugin authors can either use a wpml-config.xml to save their options in Polylang’s Translations table or use Polylang’s functions. Users will be able to translate this content from the Translations Table.
Language switchers are crucial on a multilingual site because they allow users to easily navigate between different language versions, ensuring a seamless and user-friendly experience for international visitors.
To a language switcher to your Menu using Polylang, follow those 3 easy steps:
-
- Navigate to Appearance > Menus – You should see the option to add a Language switcher from the menu items section.
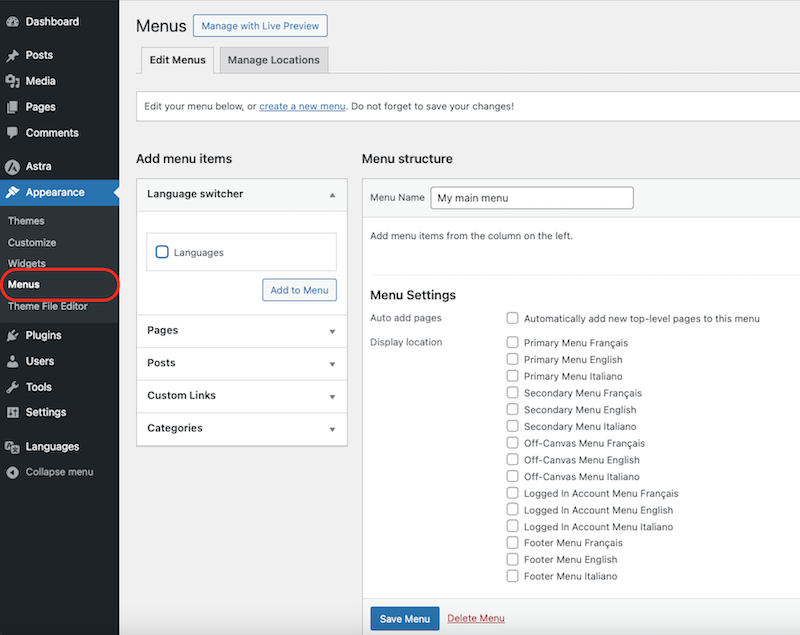
Menus section to add a language switcher
- Tick the Languages checkbox and click on the Add to Menu button.
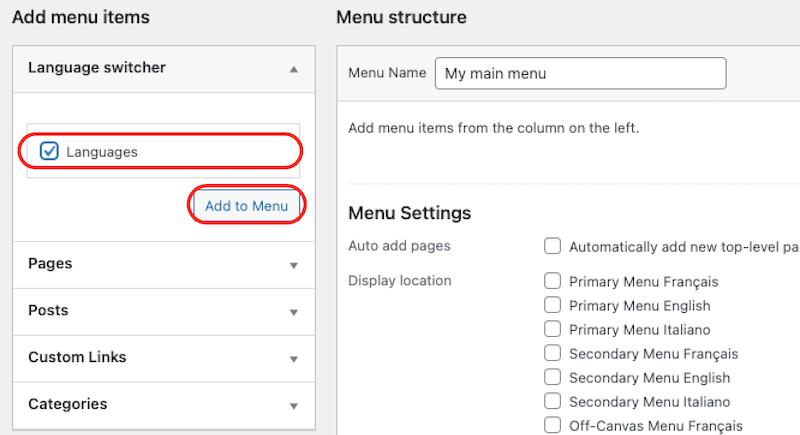
Adding the language switcher to the main menu
-
Add all your pages in the right language under the switcher:
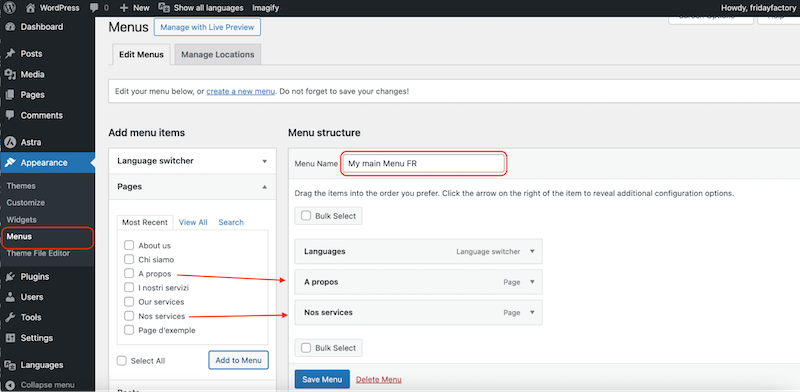
Setting the Primary menu as the language switcher location
- In the Display location section, check the Primary Menu FR box to display it on the front end. That’s it. The language switcher is now displayed in the navigation menu. Repeat those steps for each language.
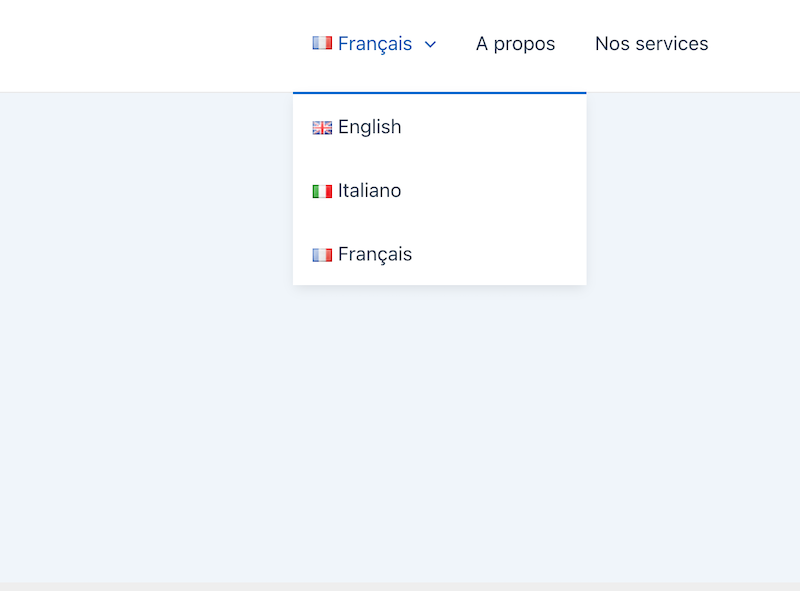
Dropdown language switcher with Polylang in the navigation menu
With Polylang, and if you are using a Classic Theme, you have the flexibility to add the language switcher anywhere on your website: whether it’s in the navigation menu, the footer and even as a widget. If you are using a Theme Block, use in addition to Polylang our “Site Editor Classic Features” plugin to handle the Language switcher.
Alternatively, you can use Polylang Pro to add the language switcher as a block in the Site Editor or in the navigation block.
This versatility ensures that visitors can effortlessly switch between languages.
Additional Tips for WooCommerce Translation
Making WooCommerce multilingual is crucial for selling abroad because it enables businesses to break language barriers and reach a global audience effectively. Ecommerce sites can provide a localized shopping experience that enhances international user engagement, builds trust, and increases the likelihood of conversions when expanding to a new market.
With Polylang for WooCommerce, your stock is synchronized between two languages and you can easily translate all your site in a few clicks. The translation process is very intuitive: the + button is located near each WooCommerce element. As the interface is very minimalist the website performance is not impacted.
-
Start with your product translation: Go to Products > All Products > Click the + button. Then, translate product names, descriptions, variations (size, color etc.) into multiple languages.

-
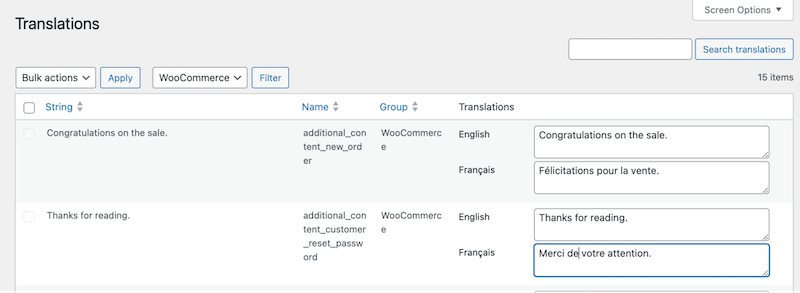
Translate WooCommerce emails and checkout Process: Go to Languages > Translations and select WooCommerce in the filters box. Start translating each field related to WooCommerce.
-
Make your product categories and tags multilingual: Translate product categories and tags to ensure consistency across languages.

|
📖More content and WooCommerce options can be translated! Read our dedicated guide about how to make WooCommerce multilingual with Polylang. |
In conclusion, creating a multilingual WordPress site in 5 simple steps with Polylang is super easy! It offers an invaluable opportunity to expand your reach and boost international sales. Polylang simplifies the translation process by allowing users to translate everything directly from the WordPress admin, ensuring convenience without compromising performance. While the Pro addon Polylang for WooCommerce of Polylang is necessary for WooCommerce shops, its basic functionality offers a seamless solution for building a multilingual online presence that resonates globally. Go multilingual with Polylang today!
 Polylang